Previously, we set up a k3s cluster managed by FluxCD. The next step is to actually make the things we deploy reachable from the outside, so for this we’ll set up Traefik and cert-manager.
Deploying Traefik
Deploying Traefik is fairly straightforward. We’ll use the official Helm chart as described in the installation guide.
We’ve added a HelmRepository and a HelmRelease with matching traefik namespace similarly to how we deployed Weave GitOps previously, just using the Helm chart defaults for now. Now we wait for Flux to reconcile the cluster.
$ kubectl -n traefik get helmrelease
NAME      AGE   READY   STATUS
traefik   7m    True    Release reconciliation succeeded
So far so good. With the Helm chart, we’ve now deployed Traefik as a Kubernetes Ingress controller - something that implements the Ingress specification in Kubernetes. What this means in practice is that we’re now able to specify all of our Traefik routes using these Ingress resources that are native to Kubernetes, rather than using Traefik-specific configuration.
Many Helm charts have the option of creating Ingress resources as part of installing the chart, so that should ideally allow us to deploy services and setting up routes for them with very little extra configuration.
Deploying cert-manager
In order to be able to access our services via HTTPS, we’ll need valid TLS certificates for the domains we’re using. Let’s Encrypt is a non-profit that issues valid TLS certificates for free, so let’s set up some automation to get the certificates we need and keep them updated. That’s where cert-manager comes in. It will be responsible for performing the necessary requests against Let’s Encrypt, and make the TLS certificates available to Traefik and the rest of the cluster.
We’ll install cert-manager using their official Helm chart. When installing cert-manager, you’ll have to decide whether to install the associated CRDs as part of the Helm chart, or separately. There is no ideal solution to this problem, so for the sake of ease-of-use we’ll install them as part of the Helm chart, by passing installCRDs: true as part of the values. We’ll go with the defaults for the remaining values.
The cert-manager service doesn’t do much on its own, so next we’ll add the necessary configuration to allow us to issue certificates. Let’s Encrypt offers a few different options for issuing certificates, in the form of “challenges”, essentially different ways to prove that you own and is in control of the domain in question. We’ll go with the DNS-01 challenge in this case. The DNS challenge allows us to issue a wildcard certificate, e.g. *.moesgaard.dev which can then be used for both foo.moesgaard.dev and bar.moesgaard.dev, but requires us to add temporary DNS records for our domain to prove that we own it. Luckily, cert-manager has integrations with a number of DNS providers which allows it to do all of this for us.
To make all of this work, we’ll need a ClusterIssuer resource, which is responsible for issuing cluster-wide certificates. We’ll configure it to work with our DNS provider (Cloudflare in this case) by giving it an API token that it can use to perform the necessary DNS records for us. Let’s Encrypt has a staging environment which can be used to test our setup, so let’s use that for now until we’re sure what we’re doing works, to prevent us from potentially spamming the regular Let’s Encrypt servers and hit a rate limit.
apiVersion: cert-manager.io/v1
kind: ClusterIssuer
metadata:
  name: letsencrypt-staging
spec:
  acme:
    email: ${EMAIL}
    server: https://acme-staging-v02.api.letsencrypt.org/directory
    privateKeySecretRef:
      name: letsencrypt-staging
    solvers:
      - dns01:
          cloudflare:
            apiTokenSecretRef:
              name: cloudflare-api-token-secret
              key: api-token
With this in place, we’ll create a Certificate resource, using this ClusterIssuer.
apiVersion: cert-manager.io/v1
kind: Certificate
metadata:
  name: "moesgaard.dev"
  namespace: traefik
spec:
  secretName: "moesgaard.dev-tls"
  issuerRef:
    name: letsencrypt-staging
    kind: ClusterIssuer
  dnsNames:
    - "*.wintermute.moesgaard.dev"
This creates a certificate for the DNS name(s) we configure. We’ve chosen *.wintermute.moesgaard.dev for now, as that is the name of the server the cluster is running on and and because *.moesgaard.dev is currently used by the old docker-compose based services. We also specify the name of the secret we’d like the actual certificate to be stored in. We create this secret in the traefik namespace, as we’ll need it to be readable by Traefik later. The Certificate resource is picked up by cert-manager, which is then responsible for fetching the certificate from Let’s Encrypt and populating the secret. A CertificateRequest is created to represent the request, and a Challenge resource is created temporarily to represent the ongoing DNS challenge against Let’s Encrypt.
$ kubectl get -n traefik certificaterequest
NAME                             APPROVED   DENIED   READY   ISSUER                REQUESTOR                                         AGE
wintermute.moesgaard.dev-xb42h   True                True    letsencrypt-staging   system:serviceaccount:cert-manager:cert-manager   18m
If all goes well, we should now have an actual usable certificate, which can be seen verified by looking at the READY field on the resource.
$ kubectl get -n traefik certificate
NAME                       READY   SECRET                         AGE
wintermute.moesgaard.dev   True    wintermute.moesgaard.dev-tls   20m
Finally, we need to tell Traefik to actually use this certificate for TLS. With Traefik this is handled through the resource TLSStore which allows us to set a default certificate, where we then point to the secret containing our certificate.
apiVersion: traefik.io/v1alpha1
kind: TLSStore
metadata:
  name: default
  namespace: traefik
spec:
  defaultCertificate:
    secretName: "wintermute.moesgaard.dev-tls"
Testing it out
All that’s left is for us to see if it actually works. Let’s try enabling ingress and TLS for the Weave GitOps we deployed previously. We’ll add the following block to the values for the Weave GitOps HelmRelease:
...
    ingress:
      enabled: true
      hosts:
        - host: weave.moesgaard.dev
          paths:
            - path: /
              pathType: ImplementationSpecific
      tls:
        - hosts:
            - weave.wintermute.moesgaard.dev
This will cause the Helm chart to create an Ingress resource for the given hostname with TLS enabled.
$ kubectl get -A ingress
NAMESPACE     NAME           CLASS     HOSTS                               ADDRESS   PORTS     AGE
flux-system   weave-gitops   traefik   weave.moesgaard.dev                 80        9m
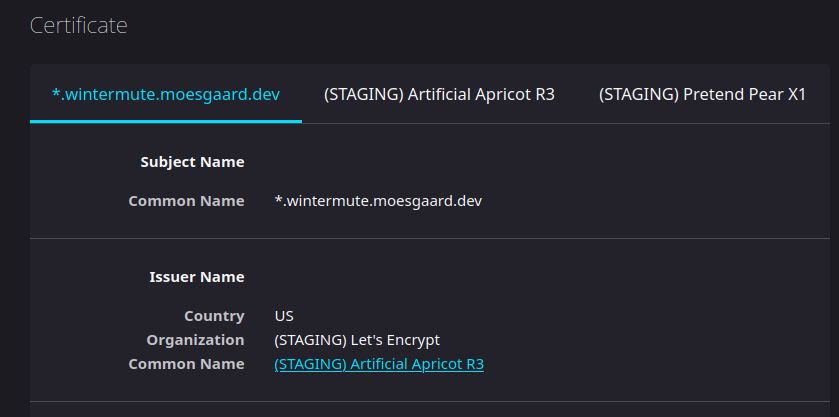
Loading this up in a browser fails, naturally, as the certificate issued by the staging environment isn’t actually functional, but inspecting the certificate shows us that it does look the way it’s supposed to.
It should be possible for us to issue actual certificates now, so let’s add another ClusterIssuer for the Let’s Encrypt production environment and configure the Certificate to use that instead. The production ClusterIssuer is identical to the staging one, except being called letsencrypt-prod and using the Let’s Encrypt production URL.

Success! We now have the Weave instance we set up earlier running behind TLS, as seen by the little 🔒 next to the URL.
Next steps
Next, we’ll get around to deploying the actual services we’ll use. The long term goal with this, is to replace the existing docker-compose-based setup, so we’ll find appropriate Helm-charts for all of those, and deploy them in the cluster.al The services we’ll deploy also need to be able to persist data is some way, so we need to configure a persistent volume for our cluster as well.
Ultimately, the biggest headache we’ll have to deal with here, is figuring out how to migrate data from the existing server to here. Data for my existing services are already stored in various Postgres databases and Redis caches, so we’ll have to figure out service-by-service how to move this over to the new setup.